
So here I am, still working towards a pattern for the RAINBOW DRESS
I discovered an inline shell pattern a few months ago and started experimenting with it. First I made a BEAUTIFUL LIGHTWEIGHT SCARF – pattern so you can see and make one too!
Then I began to work the shells in the round and out came a pattern for my ENGLISH GARDEN SUNHAT.
Next, I wanted to make a square and get my head around those tricky corners!
With the arrival of my new niece, I started making a baby blanket. The pattern is coming soon. This is a great reason to SUBSCRIBE TO EMAIL UPDATES so you don’t miss it!
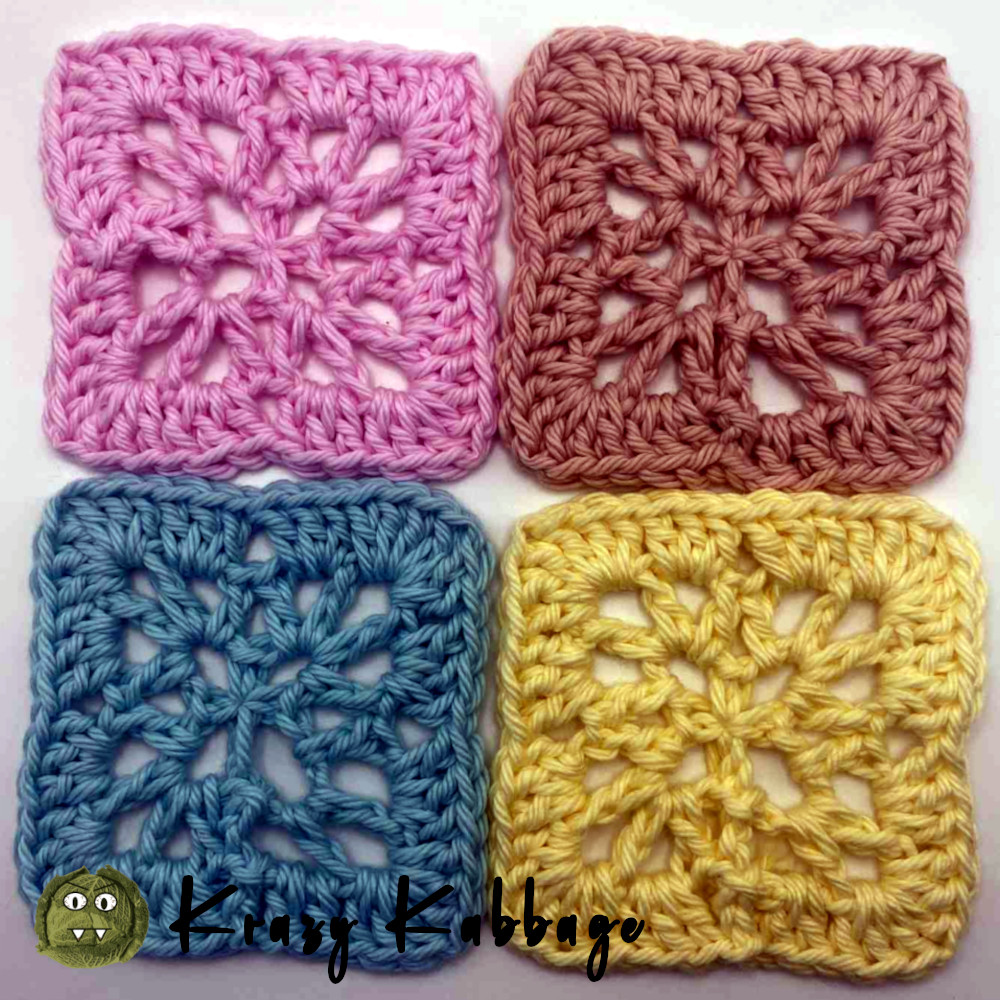
I started to write the pattern, then side-stepped a little. I published patterns for intricate lace-look COASTERS, TRIVETS, and PLACEMATS.
Back to making a cardigan for mum. I designed and made the FEATHER STORM COAT for her a few years ago. This time, she requested a lighter-weight cardigan with no hood. And, since I want to try and make a cardigan with these inline shells, here we are.

Yarn choice – I really like working with the Yarn Bee Sugarwheel Cotton – its super soft and gently transitions through different hues: I showed Mum these three gorgeous colors and had her choose one for her cardigan:
She picked out the purple-gray ‘Honey, it’s homemade’ colorway. Excellent choice!
I did some playing around while sitting with the ladies at my local crochet/knit club. I wanted to make the shells wider. It looked pretty nice but I couldn’t get the stitch counts to work.

So, I decided to stick with the twelve-stitch repeat. Also, I knew I wanted to start and end the rows with a half shell. My idea was to make a chain, double crochet across it, then start working the shells. Yet, earlier experience told me to combine the two. I should make a run of foundation double crochet and work shells into that.
Foundation double crochet looks better and has more stretch compared to double crochets worked into a chain. Either way would work fine though!

Here I was just playing, trying to size it out, the fun, sans-math way!
I intended to make a hexagon but got a pentagon instead…oops. From this, I found the neck hole a little too snug for my liking. I frogged it back to the end of the foundation double crochet line, then extended it. Instead of stopping at a hexagon, I went to an octagon.
The math: 12 dc per repeat, 8 repeats is 12×8=96. Plus 1 since a shell is divided across the row ends and thus split over 2 stitches as opposed to the usual 1. Total of 97 FDC.
Then continue with the pattern I have so far.
Row 2: Ch 2 and turn. Each shell is 7 dc instead of 5 since we need increases. Start with a half shell, and, if the ch 2 doesn’t count as a stitch, we need 4 dc in that first dc. Then, working the shell sequence, *chain 2, skip 3, single crochet in the next. Chain 4, skip 3, sc in the next. Chain 2, skip 3, 7dc in the next. Repeat from * across. When you reach the end of the row work 4 dc (not 7) in that last stitch. Chain 2 and turn.

Row 3: Dc in the first stitch, ch 1, dc in the next dc, ch 1, dc in the next dc, ch 1 and dc in next. *Chain 2 and sc in the chain 4 space. Ch 2, [dc in next dc and ch 1] 6 times. Dc in 7th and repeat from * across. On the last shell there’s just 4 dc. After the last dc ch 2 and turn.
Row 4: Dc in the first dc and ch 2, dc in the next, ch 2, dc in the next, ch 2, dc in next. Do not ch 2 between shells. Dc and chain 2 across the shell (7 dc total). For the last shell dc, ch2, after the last dc ch 2 and turn.
Row 5: 3 dc in each ch 2 space across and dc in last dc. There’s 6 ch 2 spaces per shell, 3 dc in each shell so 6×3=18 dc per shell. 7 full shells so 7 x18=126 dc. For the half shells on either end there is only 3 chain 2 spaces so 9 dc each shell. Plus 1 dc at end of row. 126+18+1= 145 dc total. Then chain 2 and turn.

Then I had to decide on how to distribute the increases. I chose to split the shells like I did at the ends of the row. 4 dc into 1 dc. Then single double crochet across the shell to link the two halves together.
Row 6: Dc in each of the first 3 dcs. The next stitch should be the last dc of the first 3 dc cluster. 4 dc in that dc. *Ch 2. Skip 3. Sc in next, ch 4, skip 3 sc in next. Ch 2, skip 3. 4 dc in next (this, like all shells, should land in the last dc of a 3 dc cluster). Dc in each of the next 5. 4 dc in next. Repeat from * across. After the last shell, dc in each of the last 3 dcs. Ch 2 and turn.

Row 7: Dc in each of the first 4. *Work across shell: [Ch 1, dc in next] 3 times. Ch 2, sc in ch 4 space, ch 2. Work across shell: [dc in next, ch 1] 3 times. Dc in each of next 7. Repeat from * across. After the last shell, dc in each of last 4. Ch 2 and turn.
Row 8: Dc in first. Ch 2 and skip 2, dc in next. Work across shell: [ch 2, skip chain, dc in dc] 3 times. Jump to next shell: [dc in dc, ch 2 and skip chain] 3 times. [Dc in next, ch 2, skip 2]
Row 9: 3 dc in each ch 2 space across and dc in last dc.
Row 10: Dc in each of the first 6 dcs. The next stitch should be the last dc of the second 3 dc cluster. 4 dc in that dc. *Ch 2. Skip 3. Sc in next, ch 4, skip 3 sc in next. Ch 2, skip 3. 4 dc in next (this, like all shells, should land in the last dc of a 3 dc cluster). Dc in each of the next 11. 4 dc in next. Repeat from * across. After the last shell, dc in each of the last 6 dcs. Ch 2 and turn.

The pattern repeats every 4 rows. The shells stretch out more with each repeat. Add an extra 3 dc for the half shells at the beginning and end of rows. An extra 6 dc for the 7 full shells.

I love how it’s looking so far. I’m going to keep going, then divide it up for the body and arms. Stay tuned!


I like your creations !
Thank you 🙂
HI KAT,
YOUR MOTHER IS GOING TO LOVE THAT SHAW!! IT’S BEAUTIFUL!!
PLEASE LET ME KNOW WHEN YOU FINISHED IT, I WOULD LOVE TO HAVE THE PATTERN SO I CAN MAKE ONE FOR MYSELF, I’M ALWAY COLD.
ALL YOUR OTHER DESIGNS ARE ALSO BEAUTIFUL TOO!!!
YOU ARE AWESOME AT DESIGNING!!
Thank you so much 🙂 Please subscribe to my emails if you haven’t already. You will get an email when the pattern is available 🙂